Step 8 - Add Interactivity
Adding Interactivity to Your Map
In this final step, we'll add interactive features to your map: navigation controls, a scale bar, a click popup on the trail, and a hover effect.
All JavaScript goes inside the <script> tag in index.html, after the map initialization.
Add Map Controls
Add navigation controls and a scale bar:
    // Add navigation controls (zoom, rotate, pitch)
    map.addControl(new maplibregl.NavigationControl(), 'top-right');

    // Add scale bar
    map.addControl(new maplibregl.ScaleControl({
      maxWidth: 100,
      unit: 'metric'
    }), 'bottom-left');
Test Your Interactive Map
-
Make sure your server is still running. If not, run
caddy runin the terminal. -
Refresh your browser:
- Local:
http://127.0.0.1:1234/index.html - Codespaces: use your forwarded URL (e.g.,
https://xxxxx-1234.preview.app.github.dev/index.html)
- Local:
You should see navigation controls on the top right, and a scale bar on the bottom left corner of the browser window.
Add Click and Hover Interactivity
The trail line is the only interactive layer — the Protomaps basemap features don't have click handlers. To make clicking easier on the thin dashed line, we'll add a wider transparent hit area alongside a hover layer.
-
Add these two layers to your
style.jsonimmediately below thetrail-linelayer:{ "id": "trail-line-hit", "type": "line", "source": "te-ara-hura", "paint": { "line-color": "transparent", "line-width": 20 } }, { "id": "trail-line-hover", "type": "line", "source": "te-ara-hura", "paint": { "line-color": "#b81515", "line-width": 3, "line-dasharray": [2, 2] }, "layout": {"visibility": "none"} } -
Add these handlers to
index.htmlinside the<script>tag, after the map initialization:
    // Show popup on click
    map.on('click', 'trail-line-hit', function(e) {
      const properties = e.features[0].properties;
      const name = properties.name || 'Te Ara Hura';
      const surface = properties.surface ? `<br>Surface: ${properties.surface}` : '';

      new maplibregl.Popup()
        .setLngLat(e.lngLat)
        .setHTML(`<strong>${name}</strong>${surface}`)
        .addTo(map);
    });

    // Show hover layer and pointer cursor on mouseenter
    map.on('mouseenter', 'trail-line-hit', function() {
      map.getCanvas().style.cursor = 'pointer';
      map.setLayoutProperty('trail-line', 'visibility', 'none');
      map.setLayoutProperty('trail-line-hover', 'visibility', 'visible');
    });

    // Restore default layer and cursor on mouseleave
    map.on('mouseleave', 'trail-line-hit', function() {
      map.getCanvas().style.cursor = '';
      map.setLayoutProperty('trail-line', 'visibility', 'visible');
      map.setLayoutProperty('trail-line-hover', 'visibility', 'none');
    });
Test Your Interactive Map
-
Make sure your server is still running. If not, run
caddy runin the terminal. -
Refresh your browser:
- Local:
http://127.0.0.1:1234/index.html - Codespaces: use your forwarded URL (e.g.,
https://xxxxx-1234.preview.app.github.dev/index.html)
- Local:
-
Test interactions:
- Click on the trail: should show a popup with the trail name
- Hover over the trail: should darken and the cursor should change to a pointer
- Use the zoom controls: should zoom in/out smoothly
Commit Your Changes
Add, commit, and push your revised index.html and style.json to your fork.
Verify that the map you see via your server (local or Codespaces) and the one you see via GitHub Pages match the image below.
What You Have Now
At the end of this step, you should have:
- Navigation controls (zoom, rotate, pitch)
- Scale bar showing metric distances
- Click popup showing trail name and surface type (if available)
- Hover effect with cursor change
Congratulations!
You've completed all 8 steps! You now have a fully standalone web map with:
- A working MapLibre GL JS map
- Protomaps basemap tiles served from a local PMTiles file
- Te Ara Hura trail displayed from a local GeoJSON file
- Terrain visualization with hillshade
- Interactive controls, popups, and hover effects
Your Map Preview
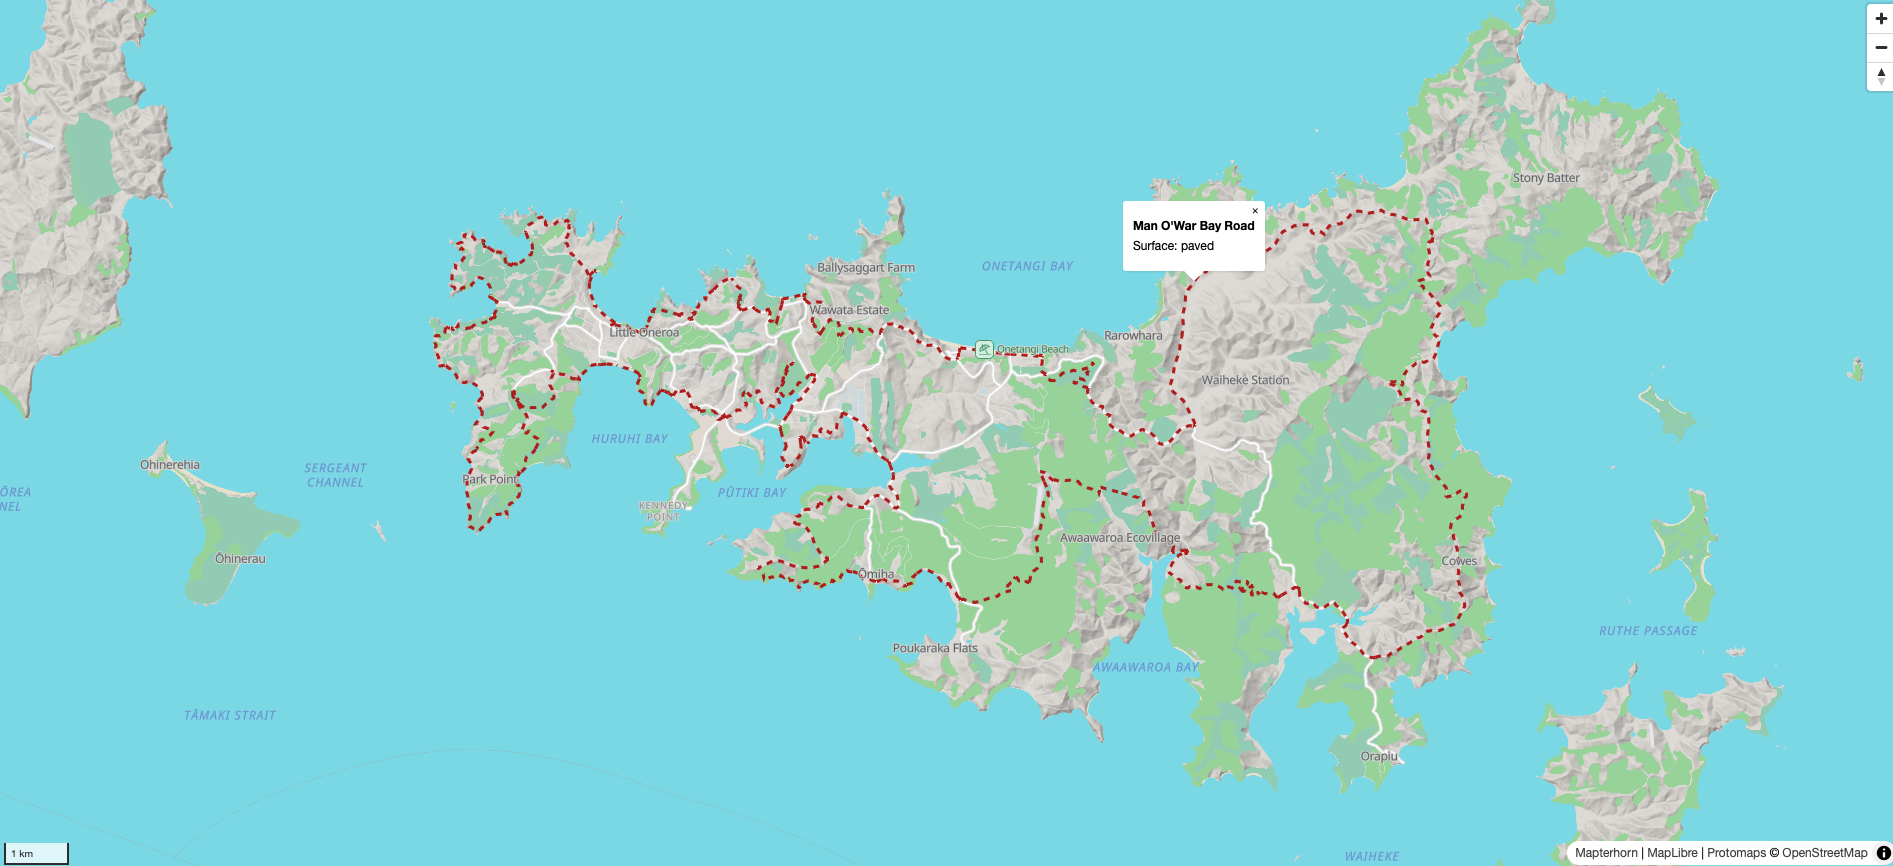
This is what your map should look like with interactivity added